Website powered by

ZBrush Zscript 05 - Macro - ShellExecute and Custom Icons

Tutorial / 26 March 2024

I wanted a way to have some custom UI buttons to open directories in Zbrush and be more like the maya shelf for some macros.  I was struggling to find the right format for ShellExecute command this is what finally worked:

// ZBrush macro
[IButton, "???", "Opens the ZStartup > Macros folder in Windows Explorer",
    [ShellExecute, "explorer.exe C:\Program Files\Maxon ZBrush 2023\ZStartup\Macros\"]
,,,,"macros.psd"]


I placed the above macro txt file and the psd of the icon in a folder under macros:

C:\Program Files\Maxon ZBrush 2023\ZStartup\Macros\FLDR_CLKR

For simplicity everything can be held in the same folder.  But in principle it will work for nested directories in more complex macros and plugins.

back in Zbrush press "Macros>Reload All Macros"

If the macro loads correctly your custom icon should appear.  When you click on the icon it will open the macros folder.  Very simple but a nice convenience and it gives me some ideas for more macros and icons.  

All this info is out there online but I wanted to capture the basics for myself maybe it helps you too!   

Maya - Python - Paste Image From Clipboard

General / 12 March 2024

I'll Back up and Share some nice scripts that come about messing with ChatGPT - This will create a plane from the clipboard (Windows). Pretty Handy for modeling from reference.  It can run from the script editor or shelf:


import maya.cmds as cmds
from PIL import ImageGrab
from PIL import Image
import tempfile
import time


def create_unique_poly_plane():
    global last_image_hash


    try:
        # Capture the image from the clipboard using PIL (Pillow)
        clipboard_image = ImageGrab.grabclipboard()


        if clipboard_image:
            # Generate a hash of the clipboard image to detect new images
            current_image_hash = hash(clipboard_image.tobytes())


            # Check if the image is new
            if current_image_hash != last_image_hash:
                last_image_hash = current_image_hash


                # Get image dimensions
                image_width = clipboard_image.width
                image_height = clipboard_image.height


                # Unique naming
                timestamp = int(time.time())
                plane_name = f"Clipboard_Poly_Plane_{timestamp}"
                texture_name = f"Clipboard_Texture_{timestamp}"


                # Create a polyPlane in Maya with the same dimensions
                poly_plane = cmds.polyPlane(
                    width=image_width / 100.0,  # Convert to Maya units (cm)
                    height=image_height / 100.0,  # Convert to Maya units (cm)
                    subdivisionsWidth=1,
                    subdivisionsHeight=1,
                    name=plane_name
                )


                # Save the clipboard image to a temporary file
                temp_image_path = tempfile.gettempdir() + f"/{texture_name}.png"
                clipboard_image.save(temp_image_path, "PNG")


                # Setup shader and texture
                setup_shader(poly_plane[0], temp_image_path, texture_name)


                print(f"PolyPlane '{plane_name}' created with new clipboard image as a texture!")


            else:
                print("Clipboard image is the same as the last one processed.")


        else:
            print("No image found on the clipboard.")


    except Exception as e:
        print("An error occurred:", str(e))


def setup_shader(poly_plane, image_path, texture_name):
    # Open Hypershade and create a shader network
    cmds.HypershadeWindow()
    lambert_shader = cmds.shadingNode('lambert', asShader=True, name=f"Lambert_{texture_name}")
    shading_group = cmds.sets(renderable=True, noSurfaceShader=True, empty=True, name=f"SG_{texture_name}")
    file_texture = cmds.shadingNode('file', asTexture=True, name=texture_name)


    # Connect file texture to Lambert shader
    cmds.connectAttr(file_texture + '.outColor', lambert_shader + '.color')
    cmds.connectAttr(lambert_shader + '.outColor', shading_group + '.surfaceShader')


    # Set the file texture path
    cmds.setAttr(file_texture + '.fileTextureName', image_path, type="string")


    # Assign the shader to the polyPlane
    cmds.select(poly_plane)
    cmds.hyperShade(assign=lambert_shader)


# Initialize the last image hash
last_image_hash = None


# Example usage: Call this function each time you want to create a polyPlane from a new clipboard image
create_unique_poly_plane()


ZBrush Zscript 05 - Macro - Instance on X using Array

Tutorial / 31 August 2023
These shoulder pads are 3.5 million Active points.  Clip curve is a problem across the axis.  Mask curve is useless across the axis and a few other problems just using symmetry.  


Most of the time working with Symmetry in Zbrush is perfectly fine.  But an alternative is to use the array feature to mirror an instance of the subtool across the axis.  It has a lot of advantages.  50% of the points needed, and all the clip and slice tools work much better.  You can also cross the axis without symmetry interfering.  


Example 1 - 3.5 million down to 1.25 million.  Clip and mask only consider the "real" object not the instance.


Example 2 - Sometimes you want to do interesting things across the axis.  This is less difficult compared to symmetry mode.  


Here's a Macro I now use to set this up quickly:  Copy and paste this into a text file - save that text file somewhere in your zbrush macros folder.  This will only work on something that is already 2 symmetrical parts across the X axis - like these shoulder pads.  Gloves and Shoes?  

Macro working below - red object is instanced across X by the macro:

>>>>  Let me know if it helps you and any other macro ideas! Thanks.  <<<<

//ZBRUSH ver 2023 - https://www.artstation.com/mattwaggle
[IButton,???,"Creates a single instance in Array and Mirrors that instance on X axis.  Must start on symmetrical object.  If in a folder - folder must not be collapsed.",
[IShowActions,0]
[IConfig,2023]


[IUnPress,Draw:Perspective] [TransformSet, ,,,,,,,-90,180] [IPress,Transform:Fit] [IPress,Tool:Masking:Mask By Depth] [ISet,Tool:Geometry:SDiv,1]

// Sets up the array correctly [IPress,Tool:ArrayMesh:a.Array Mesh] [IPress,Tool:ArrayMesh:a.Transpose] [IPress,Tool:ArrayMesh:a.Lock Pos] [IPress,Tool:ArrayMesh:a.X Mirror] // [IPress,Tool:SubTool:Split Masked Points] [IPress,Tool:SubTool:SelectDown] [IPress,Tool:SubTool:Delete] [IPress,Tool:SubTool:SelectUp]


[TransformSet, ,,,,,,,0,0] [IPress,Transform:Fit]

[IPress,Tool:Geometry:Higher Res] [IPress,Tool:Geometry:Higher Res] [IPress,Tool:Geometry:Higher Res] [IPress,Tool:Geometry:Higher Res] [IPress,Tool:Geometry:Higher Res] [IPress,Tool:Geometry:Higher Res] [IPress,Tool:Geometry:Higher Res] [IPress,Tool:Geometry:Higher Res]
[IUnPress,Tool:ArrayMesh:a.Transpose] [IUnPress,Transform:Activate Symmetry]
]


ZBrush Zscript 04 - Macro Example - Matcap Assignments

General / 25 January 2019
[IButton,???,"Clear The Matcap assignment of all Subtools",

[VarDef,subtoolName,""] // Define a new variable to store the current subtool name 
[VarDef,subtool(1024),0] // Define a Variable list to store the subtool active index
[VarSet,totalSubtools,[SubToolGetCount]] // create a variable to define the number of loop based on the subtools count
[VarSet,activeSubtool,[SubToolGetActiveIndex]] // create a variable with the current subtool Index

// Select the first subtool in the list 
[If, activeSubtool==0,
   [SubToolSelect,1]
]

// Loop to fill every subtool with the Flat Color matcap until it runs out of subtools
[Loop, totalSubtools,
[SubToolSelect,[Val,n]]
[IFreeze,
[IPress,Material:Flat Color]
[IPress,Draw:M]
[IPress,Color:FillObject]
[IUnPress,Draw:M]
[IPress,Material:SkinShade4]
]
,n]

]

^This will CLEAR all assigned Matcaps from every subtool^

As before you can copy paste this script into sublime text and save as a text file in your macros directory  ex: "C:\Program Files\Pixologic\ZBrush 2018\ZStartup\Macros"

[IButton,???,"Fill all Subtools with current Matcap",


[VarDef,subtoolName,""] // Define a new variable to store the current subtool name 
[VarDef,subtool(1024),0] // Define a Variable list to store the subtool active index
[VarSet,totalSubtools,[SubToolGetCount]] // create a variable to define the number of loop based on the subtools count
[VarSet,activeSubtool,[SubToolGetActiveIndex]] // create a variable with the current subtool Index


// Select the first subtool of the Ztool
[If, activeSubtool==0,
   [SubToolSelect,1]
]


// Loop to fill every subtool with the current matcap until it runs out of subtools
[Loop, totalSubtools,
[SubToolSelect,[Val,n]]
[IPress,Draw:M]
[IPress,Color:FillObject]
[IPress,Tool:SubTool:SelectDown]
,n]


]
^This will ASSIGN CURRENT Matcap to every subtool^

What does it do?  Often when moving a Ztool from one pc to another the matcap assignments will get mixed up.  

So this script:

1 - Stores all of the Subtools into a list

2 - Selects the first Subtool in that list

3 - Script 1 Works through each item (subtool) in the list and fills each one with the special "flat color matcap"..

Script 2 does something similar but instead of clearing the matcap it assigns whichever matcap is currently selected.

4 - The script stops when it runs down the list.

If you install them correctly you should now have two buttons in your macro menu named whatever you saved them as: 

Open one in Sublime it should look like this:


So the loop is set up - if you change the highlighted commands out with something else it will play that action out on all subtools.  Maybe you'd like to apply a polish or surface noise on all subtools.  Maybe a random rotation.  Experiment Good luck :)

Special thanks to https://puppet-master.net for sharing the above script examples I edited to help me understand using the loop on subtools.  His code and comments are very helpful.  I hope he uploads more examples!

Zbrush Zscript 03 - Macro Example - Cycle Brushes

Tutorial / 22 January 2019
[IButton,???,"Cycle Mask Brushes",

[IKeyPress,CTRL,
[If,[IGet,Brush:MaskPen]==1,
[IPress,Brush:MaskLasso]
,
[If,[IGet,Brush:MaskLasso]==1,
[IPress,Brush:MaskCurve]
,
[IPress,Brush:MaskPen]

]
]
]

,,,CTRL

]

You can copy paste this into sublime text and save as a .txt file into the macro directory: 

"C:\Program Files\Pixologic\ZBrush 2018\ZStartup\Macros"

Whatever filename you saved the text file as will now appear in the macro menu in zbrush:

If you hot key this for example to the number "5" - every time you press 5 you'll cycle through the brushes in the script.  You can bind the 5 keypress to your mouse or tablet.  I do this to free up a hand and not press control to switch my masking tools when I need to.  

So, we're using the following commands:

http://docs.pixologic.com/user-guide/customizing-zbrush/zscripting/command-reference/#IButton

http://docs.pixologic.com/user-guide/customizing-zbrush/zscripting/command-reference/#IKeyPress

http://docs.pixologic.com/user-guide/customizing-zbrush/zscripting/command-reference/#If

http://docs.pixologic.com/user-guide/customizing-zbrush/zscripting/command-reference/#IGet

http://docs.pixologic.com/user-guide/customizing-zbrush/zscripting/command-reference/#IPress


The first line is what you'll always see for a macro:

NOTE: [BRACKETS] are like the bread in a sandwich.  And the code is the meat.  If you have an open bracket [ it must have a closed one somewhere after it ] missing a bracket is a common error so keep an eye on their pairing in sublime shown by an underscore.

[BLT,Bacon,Lettuce,Tomato] - If brackets are the bread then commas signify a new ingredient.  If you read the entry on IButton in the command reference you can count 8 commas.  This is the amount of ingredients the IButton can have.  They must also remain in the correct order.  Be aware some ingredients for the button icon only work for plugins and not macros - I can explain more in a later post.

So if we want a BLT and exclude an ingredient this is how  [BLT,,Lettuce,Tomato] [BLT,Bacon,,Tomato] [BLT,Bacon,Lettuce] or my favorite [BLT,Bacon*2] - you'll notice you can leave the leftover commas off but you have to put the internal commas to "get to" the correct ordered ingredient.  Getting your [Brackets, and commas, out of order] is a common source for errors so make them part of your error checklist.


Ok back to the script I'm hungry.

If you go to View in sublime you can make a 2 column layout.  This is helpful when looking over other scripts and snipping to new ones.

Indentations, Line Spacing, and //Comments.  All good habits to keep your script legible.

^ Continuing the sandwich metaphor we'll add an [IKeyPress,CTRL, ] into the [IButtons,,,Command Ingredient]. ^

^ In the Command Group of the IKeyPress I'll add an IF statement.  Read the right column above to see more about the IF. ^

^ In the IF question I use " [IGet,Brush:MaskPen]==1 " to ask " Is the current brush a MaskPen? "  Remember according to the script I am holding CTRL for the mask tool in zbrush.  If this question returns as 1 for True I'm going to then change to the MaskLasso brush.  If it's not the MaskPen I'll get a False and do something else:

NOTE: This is obscure because it's a lot to cover.  But basically = is like saying "equals." But == is like saying "equals?"

So to be a little tricky I nested another IF statement in the False section of it's parent IF Statement.  This checks for mask lasso, if true it switches to Mask Curve, If false it switches to MaskPen.  Now the complete script works like so if you read it line for line:

1. I press CTRL

2. If I'm using Mask Pen I switch to Mask Lasso

3. If I'm using MaskLasso I switch to Mask Curve

4. If I'm using neither of these I switch to Mask Pen

This creates a 3 brush cycle every time you press the macro button.  Pretty convenient if you want to use the keyboard a little less.

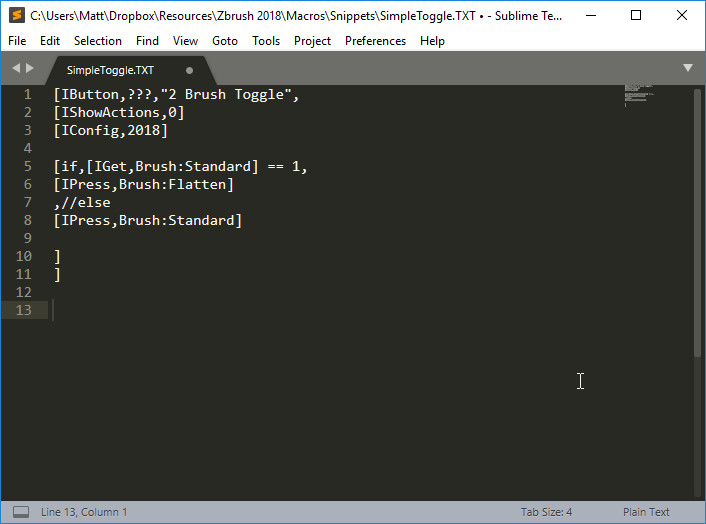
Here's another on the right to cycle some clip brushes in the same way - see if you can pick out the differences.  You can hotkey them both to be flipping between these brushes much faster.  See what you can do with the script - you can even do cycles of more than 3 if you keep nesting.  But there's a more advanced way to do this I can go over later so 3-4 seems ok for this exercise.

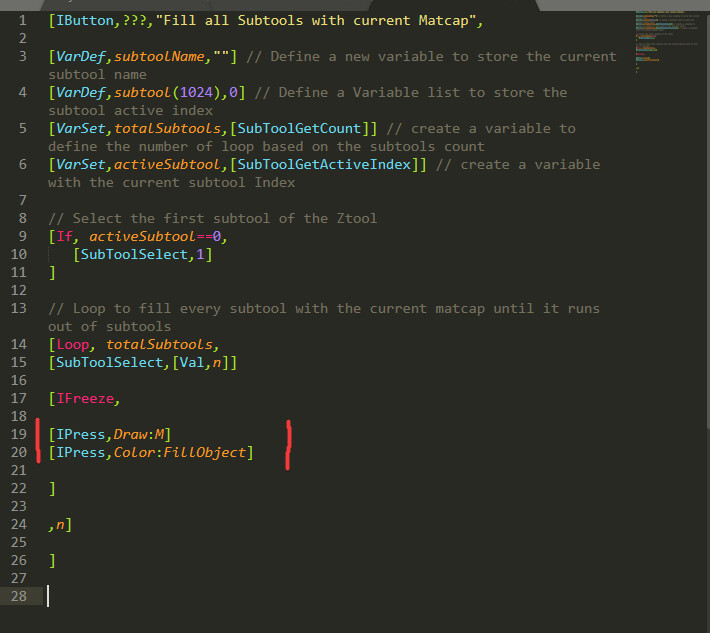
Next post I will do some looping actions on all available subtools by assigning or clearing matcap assignments.


Zbrush Zscript 02 - Macros

Tutorial / 20 January 2019

Most people start making macros by recording actions in Zbrush (ZB) and then spitting out a macro to the startup/macros folder.  Let's try this:

1. I dock the Macro menu to one of the side tabs and press "New Macro"

This option will appear - I haven't ever needed to initialize so far I always click NO before I start recording.  There's reasons you may want to initialize I can cover later but for simple scripts selecting NO is ok.

After which this notification will appear - you need to be careful since almost everything you are doing in zbrush is now being recorded.


2. Now you are ready to do something that you want automated:

Very simply I had 2 cylinders and then performed the following sequence in Zbrush:

Sequence 1: I pressed - Tools:Polygroups:Autogroups

Sequence 2: I then pressed - Tools:Polypaint:Polypaint From Polygroups

Sequence final: I then pressed Macro:End Macro and a save dialog appears.  I saved the macro in a new sub folder and gave it the name "AGPtoPP.txt"

This folder and file is held in the ZB install with all the other macros:

"C:\Program Files\Pixologic\ZBrush 2018\ZStartup\Macros"

3. You should now have a working macro button in the macros menu:

Yay it's performing that exact sequence over and over.  You can now copy this button out to a custom UI or hotkey it too.

Let's look at the script that was made:

And here's how I usually trim it immediately:

The body of the script explained:

Line 1:   IButton is ZBs way of recognizing the script as a UI element, the "???" is a special tag that tells ZB the script is a macro, the "Text" is what appears in ZB as you hover above the button.  Macros with this line saved in the macro folder appear as a button with the file name under the Macros Menu.

NOTE - Often when writing macros you'll break them.  They'll disappear from the macros menu because Zbrush failed to compile them from the TXT file to the ZB format of .zsc

Line 2:  IShowActions,0 "0" is code for "No" so this line is telling zbrush to hide the actions while the macro performs its function.

Line 3 and 4: IPress, and then the path to the UI item you want pressed.  In this case it was the two pressed buttons I recorded earlier.

NOTE - Every ui in zbrush has a path.  If you hold and Control and hover over a button the path will appear in the bottom of the tool tip.  Match this path to the path on line 4 above to see how it's working.

Even more explanation in human speech:

So you should now know how to record, save and edit simple macros and understand a little more about how they are talking to ZB.  Let me know if you record any cool ones - or have an idea of one you want made.  

Next post I'll show some more advanced stuff like performing something on all your subtools and cycling through the trim tools with one hotkey.
  

Zbrush Zscript 01 - Setup

General / 19 January 2019

I've been Making progress learning more about Zscripting and Macros - I'm not a coder so if you are starting from 0 like I did maybe my notes will help you.

Important Links: 

Zbrush Command Reference - This will look confusing at first but as you learn more you will be referencing it all the time.

Sublime Text - Really the best option for this type of scripting - I'll show how to setup the Zscript syntax below:


1. Install Sublime Text - here I have a simple brush toggle macro open as an example (I hotkey this to switch brushes on the same hotkey.)


2. goto Tools>Install Package Control


3. Let this install finish then press "Control + Shift + P" and Begin typing and select "Install Package"


4. Then begin typing and select "Zscript"


5. Goto View>Syntax and select Zscript


6. If everything went smoothly you should now see your document in the zscript syntax like so:

Now you are ready to read other zscripts and make your own with good looking syntax!

Note: All credit and thanks due to Siew Yi Liang for making the syntax work in sublime!

In the next part I'll show how to make some useful macros using this setup.


Symbolic Links and Cloud Storage

General / 16 April 2018

If you work in multiple locations and on multiple PCs you might benefit from knowing about Symbolic links "symlinks".

Basically you are "tricking" windows into believing a folder exists in 2 places at once. What is the benefit of this?  If you are using cloud storage like dropbox or google drive etc.  You can store whatever you want to master folders - then create symlinks to them.  Photoshop, Maya, Zbrush or any program won't know the difference and all of your presets will be backed up and updated across all your PCs.


For example:  I find a brush I like - or make a kitbash model - I just save it as I normally would and the symlinks I've set up will update to my work and home pc.


How to set up a symlink:  

STEP 1 - BACKUP EVERYTHING FIRST YOU MIGHT MESS UP

Recommended APP:

https://sourceforge.net/projects/symlink-creator/


Step 2 - Close all your proggies

Step 3 - Move your Master Folder to your cloud storage.  Allow it to finish syncing with the cloud. 


Step 4 - Create an Empty Folder that will become the symlink.  This folder should be in the program directory and named the exact same.


Step 5 - Create the links!


Check the warning!  Is it replacing the empty folder as it should?


You should see the folder icon change - your link is established.  Now anything you save into this folder will sync with your cloud storage.  You can setup the same links on any other PC.

I've done this for brushes, kitbash models, scripts and macros etc.  As far as my art programs are concerned My home PC is a mirror of my work PC so anything I discover or make will sync up.  You can even have friends or co-workers share folders.

Try it out and ask me if you have questions or need help with this.